Data Capture - Building
Data Capture - Building
The capturing of Building FAAS is very similar to Land FAAS with the exception of entering the Real Property Unit assessment detail.
To capture an existing Building FAAS record, open the Main Menu explorer.
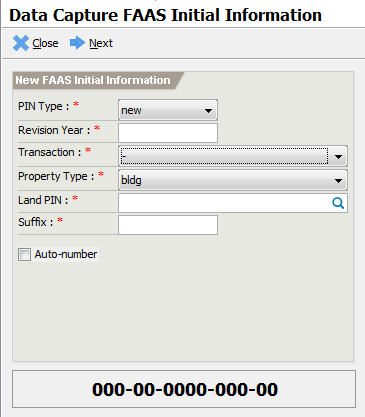
Double-click on the Transactions -> Assessor -> Manual Support -> Data Capture item or by accessing the Quick Launcher using the code DC01. This will display the Data Capture FAAS Initial Information screen.
Enter the following information:
PIN Type – valid values are new or old. The new pin type format is 000-00-0000-000-00 while the old pin format is 000-00-000-00-000.
Revision Year – the general revision year to capture
Transaction – the type of transaction for the FAS to capture
Property Type – select bldg from the list of items.
Land PIN – lookup the Land property where the building resides
Suffix – the suffix no. assigned to the building
Auto-number – normally uncheck. Used only in cases where capturing is renumbered.
Validate that the manual PIN No. matches the generated PIN No.
Click
Nextto open the FAAS main screen. See the FAAS Main Screen section for the steps of filling up the FAAS data.Click on
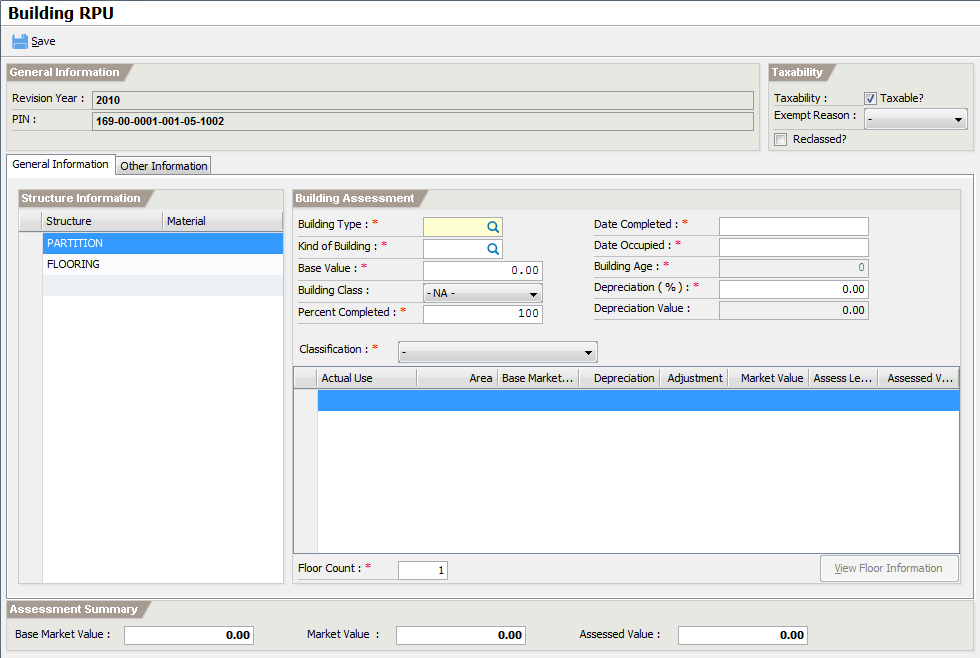
Assessment Detailto open the main RPU screen below:
On the General Information tab, enter the following information
Building Type – the required type of the building such as Type I-A
Kind of Building – the required kind of building such as One Family Dwelling
Base Value – if the base value type of the selected Kind of Building is range then enter the base value used in the computation.
Building Class – the class of the building
Percent Completed – the rate of completion of the building. This affects the market value computation.
Date Completed – the date the building was completed
Date Occupied – the date the building was occupied
Depreciation – the rate of depreciation to apply incase auto-depreciation is not set.
Classification – the classification of the building
Add the building actual use on the actual use list:
Click on the Actual Use column of the first empty row and enter the Actual Use.
Repeat the process to add all actual uses for the building.
Adding Floor Information
Floor information is set for each building actual use. To add floor information:
Select the Actual Use item to add floor information detail.
Click on
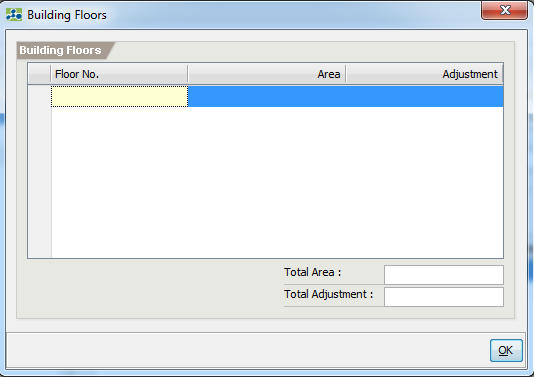
View Floor Informationto open the Building Floors screen.
Add per floor information by:
a. Click on the Floor No. column of the first empty row and enter the following information:
i.  Floor No. – the required floor no.
ii.  Area – the area of the floor.
b. After entering the Area, press Enter to commit the item.
c. Repeat steps a-b to add all floor information.
Adding Floor Adjustments
Adjustments are added on a per floor basis. Each floor can have the same or different types of adjustments associated in it. Example the 1st floor might have a garage and tiled floor while the 2nd floor might have a balcony, tiled floor and glass windows.
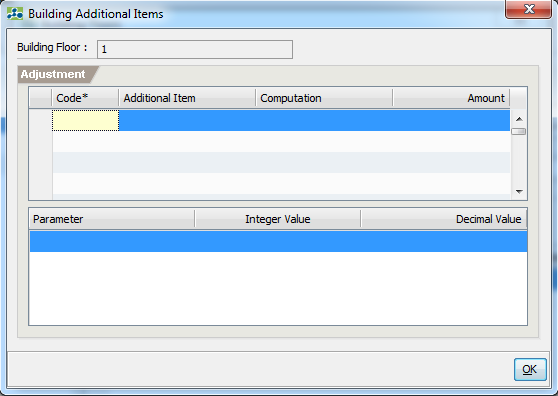
    a.  To add adjustments, select the Floor item to add adjustments.
    b.  Click on the `Floor Detail` to open the Building Additional Items screen.
    c.  Click on the Code column of the first empty row.
    d.  Lookup the adjustment type by entering its code and pressing **Enter**.
    e.  Enter the value for any parameters required.
    f.  Click `OK` to compute the adjustment.
    g.  Repeat steps c-f to add all adjustments.
Click on
OKto close the Building Floors screen.Verify that the computations are correct.
Click on
SaveandCloseto return to FAAS main screen.Click on
Saveto commit the FAAS record.Click on
Submitto forward the FAAS record for approval.Click on
Approveto approve the FAAS record.


