Online Transaction Processing
Online Transaction Processing
The Online Transactions are now strictly implemented using workflow processes within the assessor’s department. The workflow process implements a total computerization solution allowing all stakeholders to perform their tasks electronically with the goal of eliminating manual steps.
To achieve this objective, an electronic FAAS record is created which is then forwarded from workflow steps. In each step, applicable information are then added until the FAAS data is completed.
The advantages of having fully computerized transactions are:
Actual workflow processes are fully implemented
Data are encoded by the actual personnel and not by encoders
Check and balance are fully supported.
Workloads are easily monitored
Transaction and personnel efficiency can be analyzed and monitored
Basic Workflow Processes
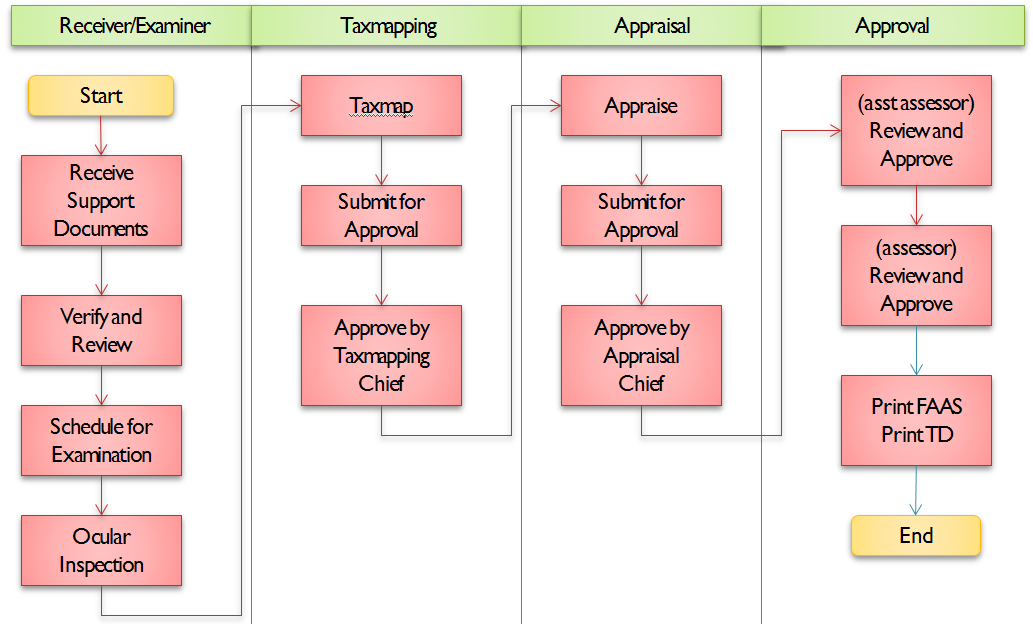
The basic workflow processes is shown below. Its starts with the Receiver/Examiner accepting the documents required for the transaction. The required documents are then verified and validated. A FAAS record is then created with all support documents added. The record is then forwarded for examination. The Examiner schedules the property for examination and performs ocular inspection. The ocular inspection finding is then reflected. The record is then forwarded to Taxmapper where it is taxmap and approved by the Taxmapper Chief/Head. The FAAS is then appraised by the Appraiser. After verification by the Appraisal Chief/Head, the record is forwarded to the Assistant Assessor for approval. The record is then approved and submitted to the Assessor who then approves the record. The approve FAAS is forwarded to the Records section and the support documents are attached digitally by scanning or photograph.
Supported Online Transactions
The supported online transactions are:
| Transaction | Quick Launcher Code |
|---|---|
| Transfer of Ownership | TR01 |
| Transfer with Reassessment | TR02 |
| Transfer with Correction | TR03 |
| Correction of Entry | CE01 |
| Change Classification | CC01 |
| Change Taxability | CT01 |
| Change Depreciation | CD01 |
| Re-Assessment | RE01 |
| Revision | RV01 |
| New Discovery | ND01 |
| General Revision | GR01 |
| Subdivision | SD01 |
| Consolidation | CS01 |
| Annotation | FA01 |
| Cancel FAAS | CF01 |
| Resection | RS01 |
| Multiple Claim Settlement | MS01 |
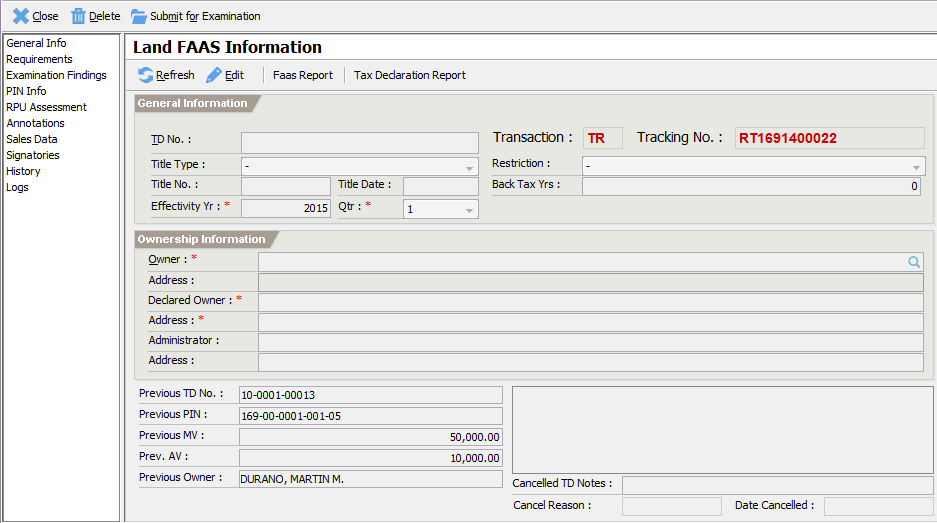
- To process an online transaction such as Transfer of Ownership, double-click on the Transactions -> Assessor -> Online -> Transfer of Ownership item. This will display the Transaction Initial Information screen.
- Search the Property to process and then click
Nextto validate and create the FAAS record and display the main workflow screen.
The main screen is divided into two parts, namely:
Section Pane – the section pane displays an information category or section such as General Info, Requirements and etc. The section list varies depending on the type of transaction and permission of the user. Most sections are displayed. A section data is editable if the user has a permission to modify the data.
View Pane – the view pane is located directly to the right of the section pane. It displays the user interface for the selected section.
Click on the Section assigned to you and modify the data as needed.
Click on
Submitto forward the record to the next workflow process.
Assigning a Workflow Process
The workflow process has built-in notification system (for member LGU only) that notifies the respective users when a new transaction is available for processing as shown below:
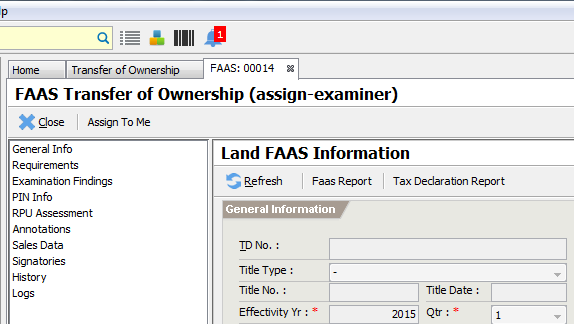
The notified user then accepts the record by clicking on the Assign To
Me button. Once assigned, the system tracks the record until it is
forwarded to the next workflow step. These steps are repeated until the
record is approved.
Subdivision
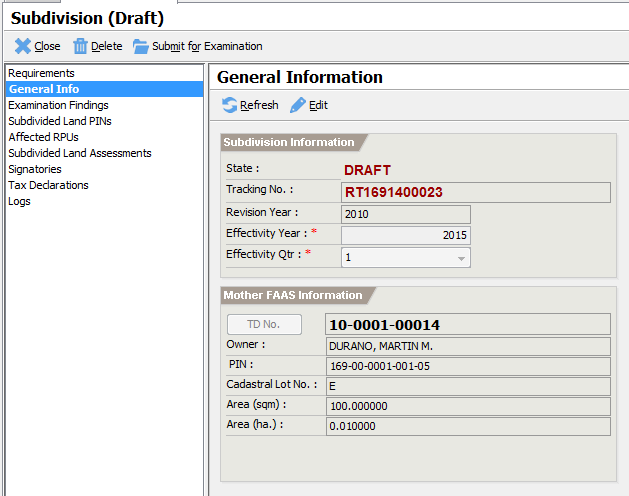
Subdivision is the process of dividing an area of land into two or more lots. Before performing the subdivision transaction the required documents must be completed and verified such as the approved subdivision plan, authority to sell from HLURB, certified true copies of TCT, realty tax clearances and etc. The property to be subdivided must be fully paid and has no pending obligations to the LGU. The subdivision can only be approved if the mother land's area is equal to the total land area of the subdivided lots. The system does not allow partial subdivision. This eliminates inaccurate status between the mother land and the subdivided lots.
During subdivision, all improvements will be manually assigned to one of the newly subdivided lots in the subdivision. This avoids the problem of an improvement still referencing a cancelled or retired land. Upon approval, the tax declarations and real property unit records of these land improvements be cancelled and new ones will be created and issued to it.
Initial Information
To process a subdivision transaction:
- Double-click on the Transactions -> Assessor -> Online -> Subdivision item or use the Quick Launcher using the code SD01. This displays the Subdivision Initial screen.
Search the Land property to be subdivided.
Enter the default memoranda. The default memoranda will be automatically provided for all subdivided lands and affected improvements.
Click
Nextto validate and create the subdivision and display the main workflow screen.
- Follow the normal transaction workflow as depicted in Error! Reference source not found..
Creating Subdivided Lands
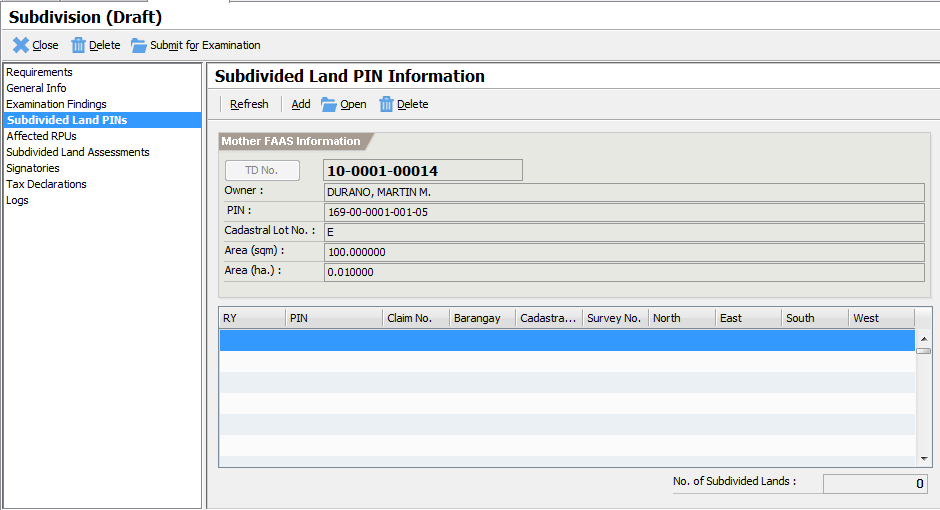
The creation of subdivided lands shall be performed by the Taxmapper. To create subdivided lands:
- Select the Subdivided Land PINs section to display the Subdivided Land PIN Information screen below.
- Click on
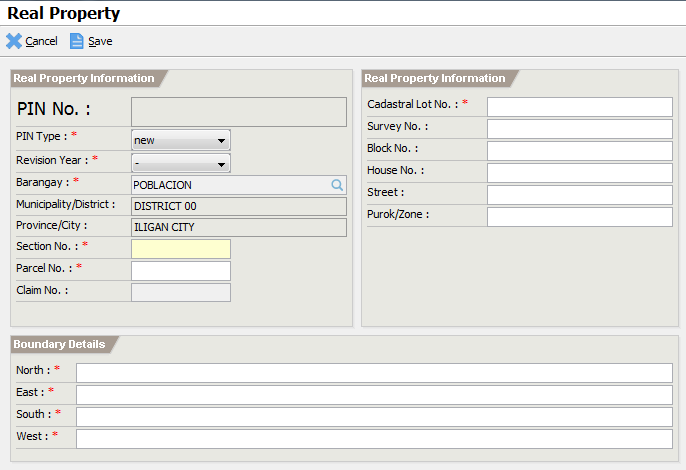
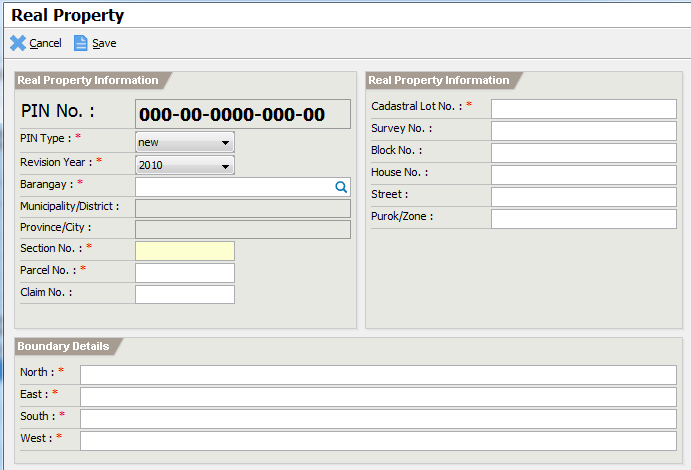
Addto open the Real Property screen.
Enter the required information:
Section No. – the required section no.
Parcel No. – the required parcel no.
Cadastral Lot No. – the required cadastral lot no.
North, East, South and West – the boundary information
Click
Saveto commit the changes.Repeat steps 7-9, to add all subdivided lands.
Affected Improvement Setup
During a subdivision transaction, there might be one or more improvements that are affected. These improvements must be transferred to one of the subdivided lands. The taxmapper must decide on the new location of all affected improvements. To update the affected improvements:
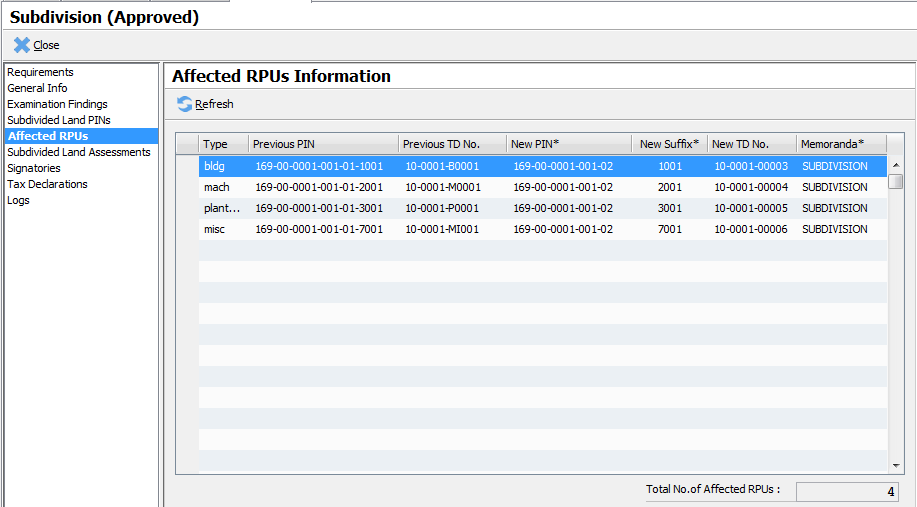
- Select the Affected RPUs section to open the Affected RPUs Information screen.
Specify the New PIN for each affected real property units.
Specify the New Suffix for each affected real property units.
Review the correctness of all information.
Click on
Submitto forward the record into the next workflow.
Consolidation
Consolidation is the process of combining two or more lots into a single lot. The transaction requires support documents such as certified true copies of TCT, realty tax clearances and etc. The property to be consolidated must be fully paid and has no pending obligations to the LGU. The owner of the newly consolidated land can be one of the owners of the land comprising the consolidation.
During consolidation, all improvements under each consolidated lands will be automatically updated. This avoids the problem of an improvement referencing a cancelled or retired land. Upon approval, the tax declarations and real property unit of these land improvements are cancelled and new ones are created.
Initial Information
To process a consolidation transaction:
- Double-click on the Transactions -> Assessor -> Online -> Consolidation item or use the Quick Launcher using the code CS01. This displays the Consolidation Initial screen.
Enter the default memoranda. The default memoranda will be automatically provided to the consolidated land and the affected improvements.
Click
Nextto validate and create the consolidation and display the main workflow screen.
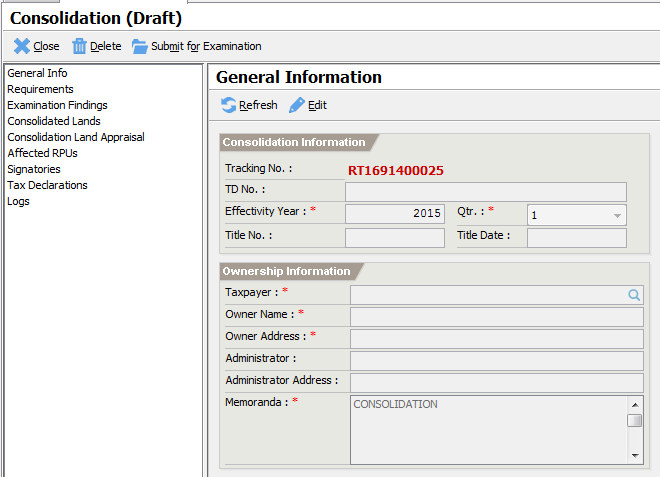
Click on
Editand enter the required information:Effectivity Year – the effectivity year
Effectivity Qtr – the effectivity qtr
Title No. – the new title no. if available
Title Date – the new title date if available
Taxpayer – the new taxpayer
Owner Name – the new owner name
Owner Address – the new owner address
Memoranda – the memoranda
Click on
Saveto commit the changes.Follow the normal transaction workflow as depicted in Error! Reference source not found..
The Consolidation Land
The consolidation land is the unified land created by the consolidation. To create the land:
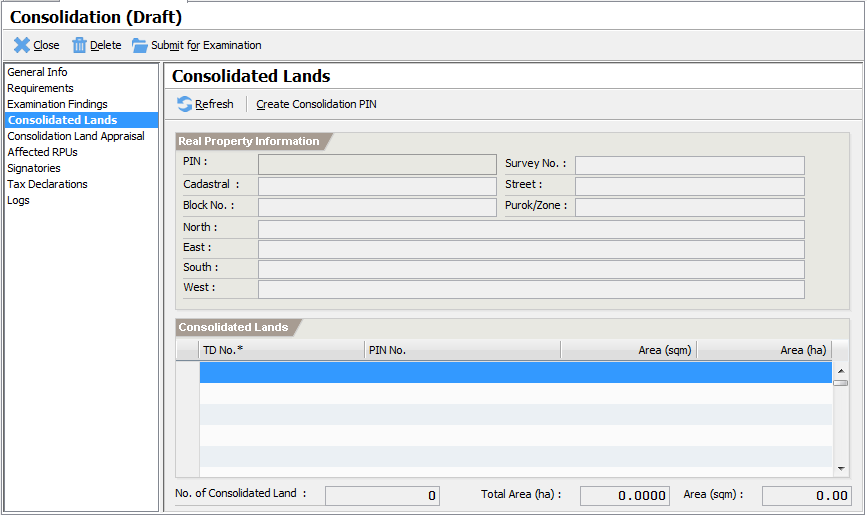
- Select the Consolidated Lands section to display the Consolidated Lands screen.
- Click on
Create Consolidation PINto open the Real Property screen.
Enter the required information:
Barangay – the barangay information
Section No. – the required section no.
Parcel No. – the required parcel no.
Cadastral Lot No. – the required cadastral lot no.
North, East, South and West – the boundary information
Verify that all information are correct.
Click
Saveto commit the changes.
Adding the Consolidated Lands
The consolidated lands are the lands to be unified. Add all consolidated lands on the list.
Click on the TD No. column on the first empty row.
Lookup the land to consolidated.
Repeat step 12 – 13 to add all lands to consolidate.
Click on
Submitto forward the record into the next workflow.
Annotation
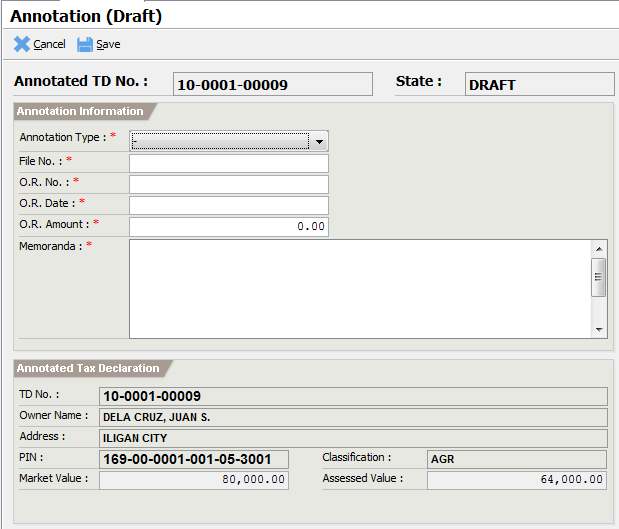
FAAS can be annotated with the following annotations such as Mortgage, Bail Bond and more. Once a FAAS is annotated, certain restrictions on majority of the transactions are applied such as the transfer of ownership, change of depreciation and etc. The annotation transaction requires payment of required fees before processing.
To annotate a FAAS:
- Double-click on the Transactions -> Assessor -> Online -> Annotation item or use the Quick Launcher using the code FA01. This displays the annotation initial screen.
Lookup the property to annotate by entering its TD No. and pressing
Enter.Click
Nextto open the main page.
Enter the required information:
Annotation Type – the type of annotation
File No. – the reference no. of the annotation document
O.R. No. – the serial receipt no.
O.R. Date – the date of the receipt
O.R. Amount – the amount of the receipt
Memoranda – the complete memoranda for the annotation
Verify all information for correctness.
Click
Saveto commit the record.Click
Submitto submit the record for approval.Click
Approveto approve the record.
Cancel Annotation
An annotation shall be cancelled once all its obligations are settled. To cancel an annotation:
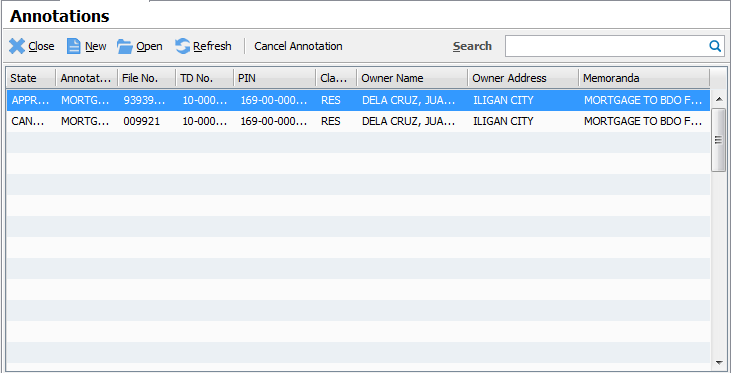
- Double-click on the Transactions -> Assessor -> Listings -> Annotation item or use the Quick Launcher using the code FA00 to open the annotation listing page.
Search and select the annotation to cancel.
Click on
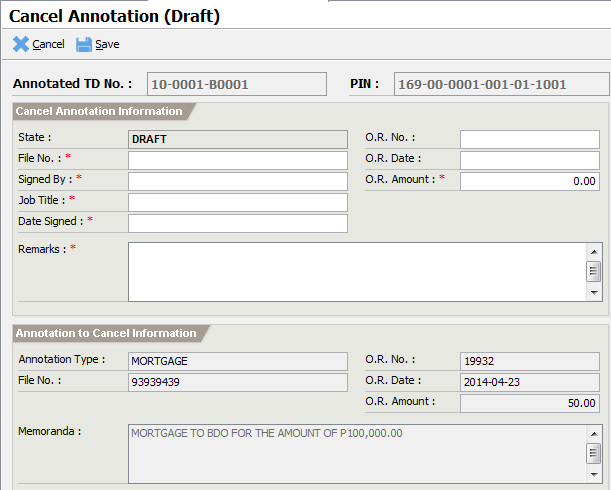
Cancel Annotationto open cancel Cancel Annotation page.
Enter the required information:
File No. – the reference no. of the cancellation document
Signed By – the signatory of the cancellation document
Job Title – the job title of the signatory
Date Signed – the date the cancellation document was signed
O.R. No. – the serial no. of the receipt
O.R. Date – the date of the receipt
O.R. Amount – the amount of the receipt
Remarks – any additional notes.
Verify that all information are correct.
Click on
Saveto commit the record.Click
Submitto submit the record for approval.Click
Approveto approve the record.
